date: 2018-01-19
Official disclaimer use at your own risk we are not responsible for what you do with this information or any harm you cause others.
Introduction
Project ‘BluePass’ was intended to make longer password entry easier for us humans, by leveraging your Android Smartphone, with its security and authentication protecting the credentials, and the ‘bluepass’ dongle is merely facilitating entry of credentials, by way of Keyboard emulation, so far it’s merely a proof of concept, that is using out of date Bluetooth2.0 hardware, so it has vulnerabilities from the get go. We also have Windows Password Filter that can ban the use of dictionary words and variants such as leet speek and other common substitutions (contact us for details). We were aiming to keep the hardware cost under £10.
Alternatives;
Android can be rooted and the kernel modified to allow direct USB HID emulation (impractical for everyday users).
There is also the WiFi option with host software on your PC (Impractical for businesses).
And recently inputstick .com have launched in 2018 the same thing for (£45) that you can build here, prior work can be viewed on youtube here https://www.youtube.com/watch?v=UgaEjUGRP3M or search ‘BluePass ProtoType Demo’.
Some apps can talk direct to Bluetooth as Bluetooth Keyboard and Mouse, Dongles are about £10.
Apps are available to output to said keyboards direct from password managers.
Alternate Uses;
You can create custom payloads by building up a macro to replay all the keystrokes necessary to achieve your goals.
Hardware selection and Assembly

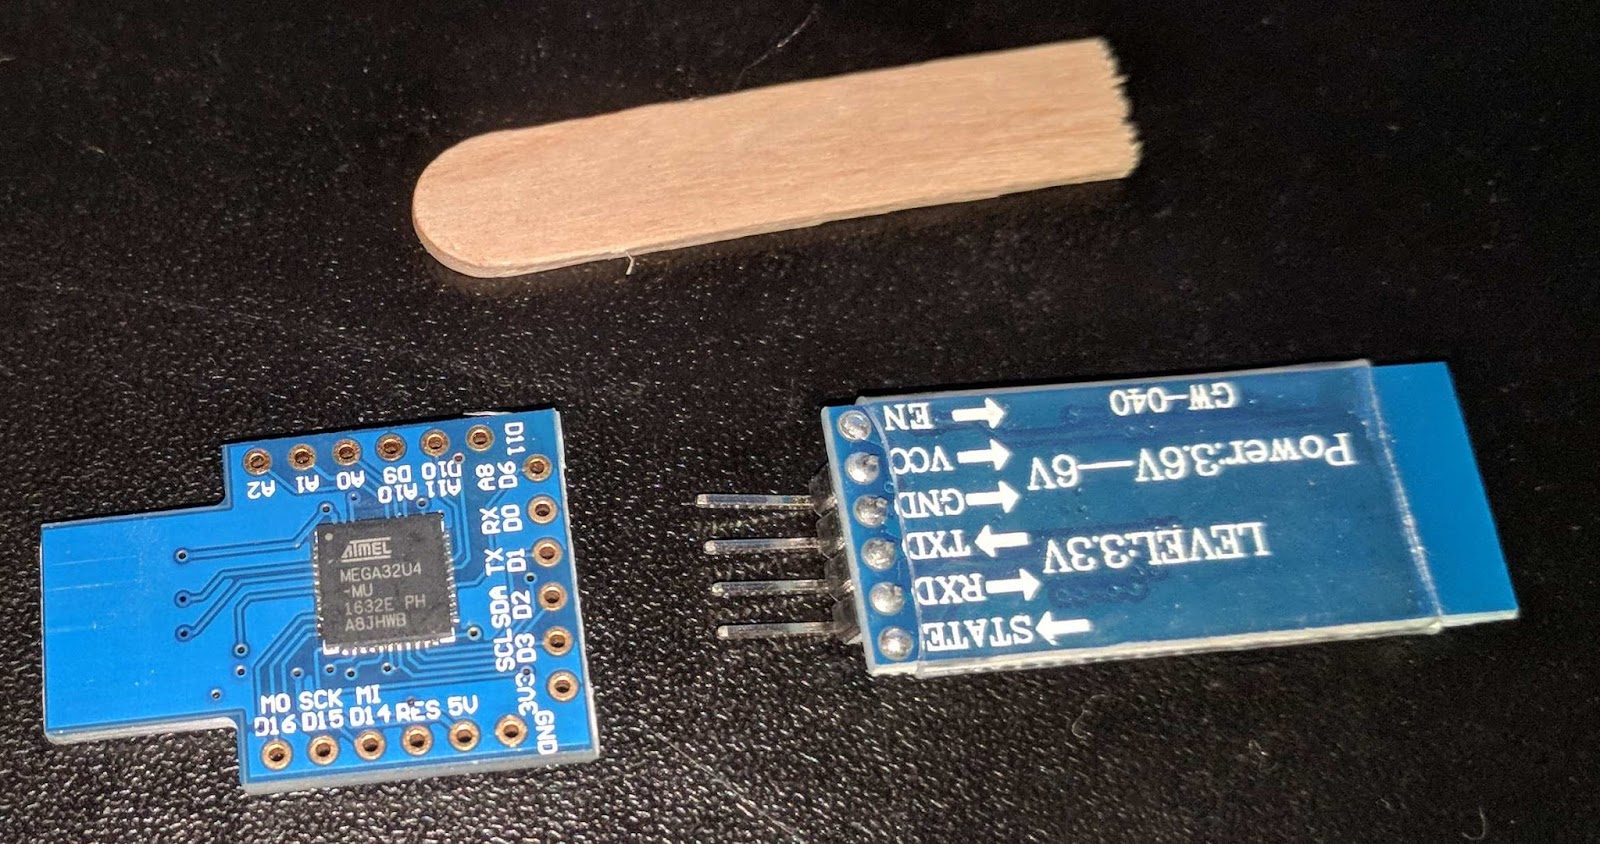
We settled on the AT32U4 chip in the perfect package (beetle) on an auction site. Being based on the same chip as the Arduino Leonardo boards it acts as a HID device for keyboard and mouse, maybe even gamepad too. This was then coupled up with the HC06 BT2.0 module, but other modules could be substituted.
You can read up on Bluetooth security in NIST SP 800-121r1.
As for the ESP8266 WiFi module, they say it can do many things, yet I’m not able to find out how to make it talk wifi direct in the world of Android, seems it can only do soft ‘AP mode’ or act as a ‘Client’. I would have elected to use this device if it were possible.
As you can see in the image below we have 4 pins to connect, I connect the serial pins direct and then add wires for the power side.

Just the back side of the boards detail pins.
I use needle nose pliers to bend the serial pins over, I then bend the gnd pin in opposite way.
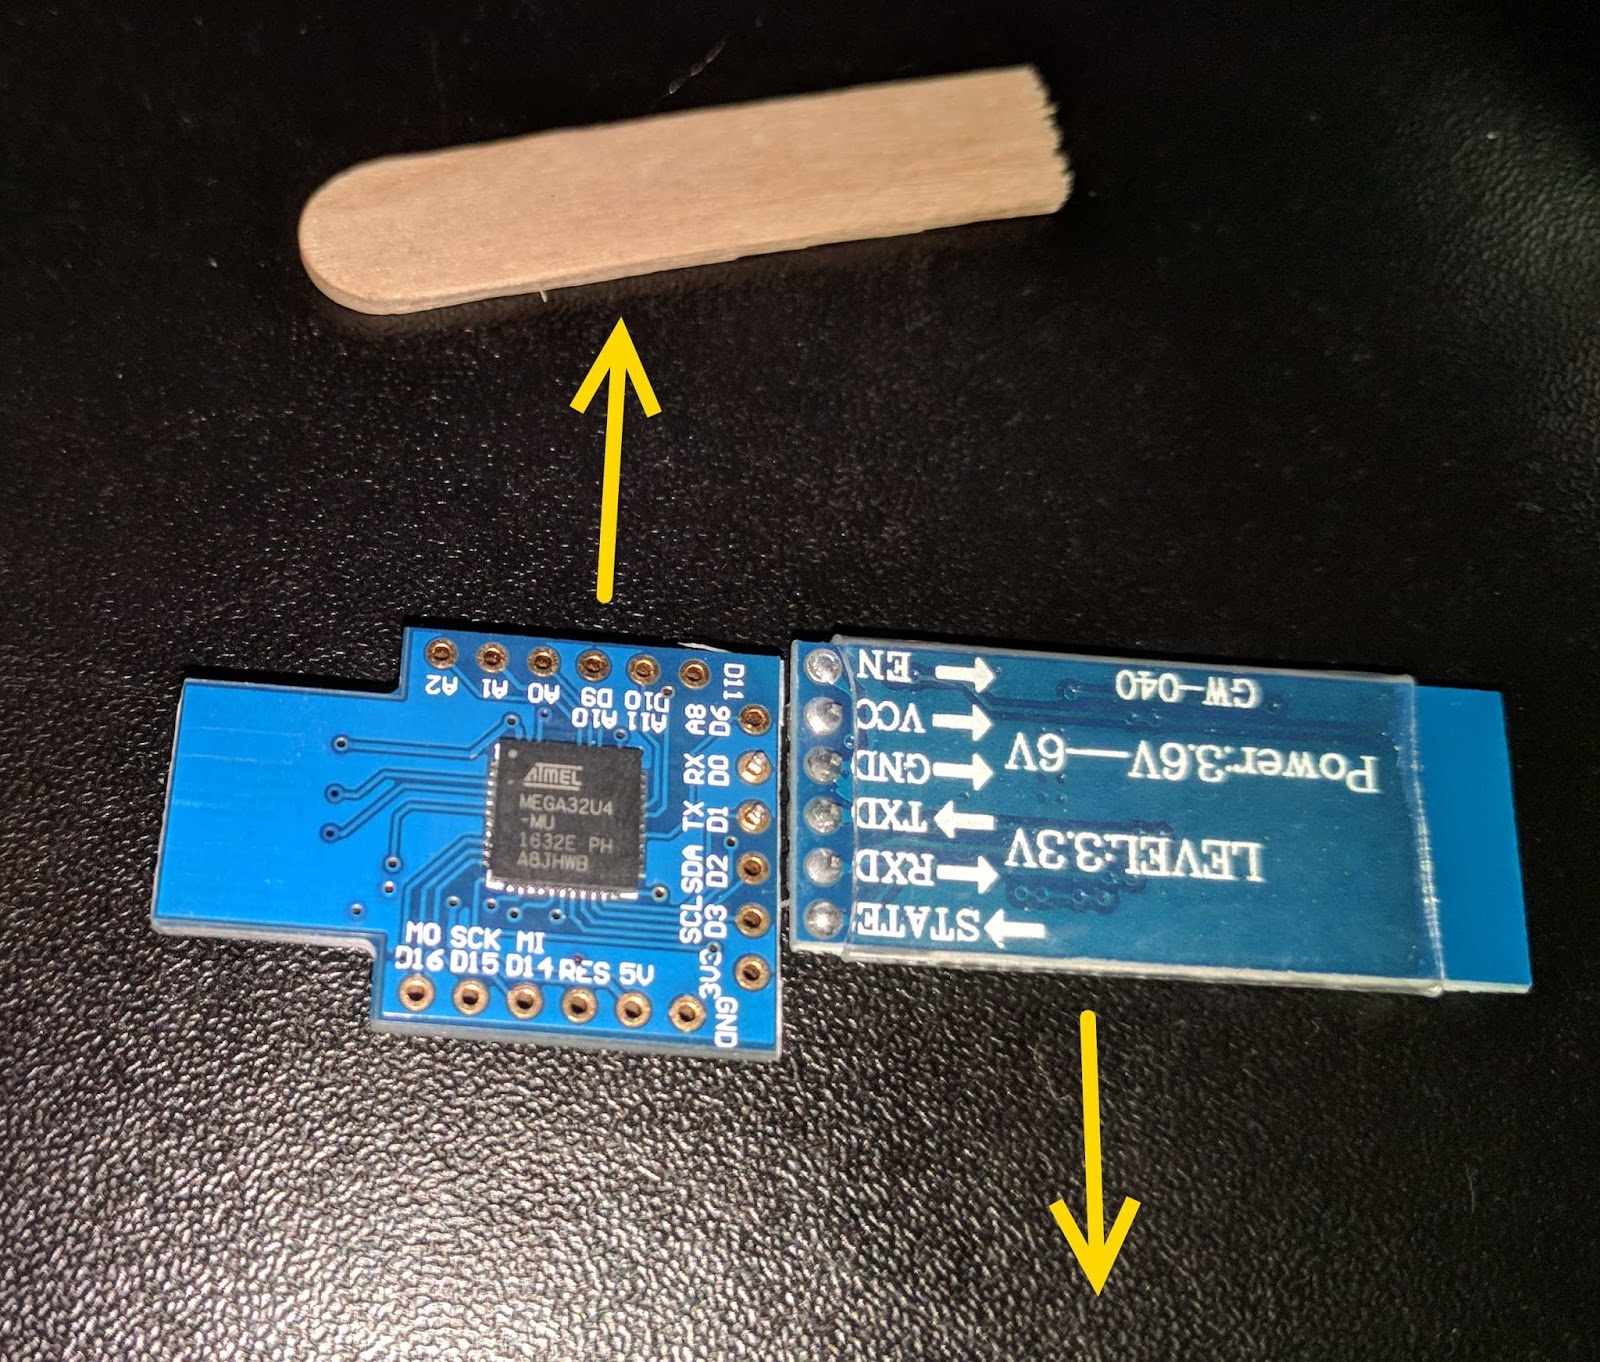
With the serial pins sat in target holes, we slide the boards in opposite directions to bend the pins diagonally and bring them closer and more aligned on one side, you can solder them in place now.
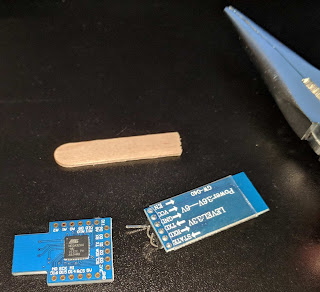
You can see clearly the gnd pin point in opposite direction after bending it back, attach and solder wires to vcc and gnd and the respective holes as per picture above. Use the lolly pop stick to add stiffness to the dongle and cover with heat shrink wrap ~25mm should just about squeeze over.

Finished dongle in 3d printed case.

AT32U4 Firmware
Install latest arduino IDE from https://www.arduino.cc/en/Main/Software https://www.arduino.cc/download_handler.php?f=/arduino-1.8.5-windows.exe create new sketch and drop in code from below.
// for 32u4 compiled in arduino ide 1.6.11
// board = Arduino Leonardo
#include “Keyboard.h”
char inChar;
byte inByte;
int DebugPin = 17;
void setup() {
pinMode(DebugPin, OUTPUT);
// open the serial port:
Serial1.begin(9600);
// initialize control over the keyboard:
digitalWrite(DebugPin, HIGH); // turn the LED on (HIGH is the voltage level)
delay(1000); // wait for a second
digitalWrite(DebugPin, LOW); // turn the LED off by making the voltage LOW
Keyboard.begin(); // must be last to work properly
}
void loop() {
// check for incoming serial data:
if (Serial1.available() > 0)
{
// read incoming serial data:
Serial1.readBytes(&inByte, 1);
inChar = inByte;
switch(inByte)
{
case 19 :
Keyboard.press(KEY_LEFT_GUI);
inChar = 108; // l key
Keyboard.press(inChar);
delay(100);
Keyboard.releaseAll();
break;
case 20 :
Keyboard.press(KEY_LEFT_CTRL);
Keyboard.press(KEY_LEFT_ALT);
Keyboard.press(KEY_DELETE);
delay(100);
Keyboard.releaseAll();
break;
case 34 :
inChar = 64;
Keyboard.write(inChar);
break;
case 35 :
inChar = 92;
Keyboard.write(inChar);
break;
case 64 :
inChar = 34;
Keyboard.write(inChar);
break;
case 92 :
inChar = 236;
Keyboard.write(inChar);
break;
case 124 :
inChar = 0;
// Keyboard.write(inChar);
break;
case 126 :
inChar = 124;
Keyboard.write(inChar);
break;
case 163 :
inChar = 35;
Keyboard.write(inChar);
break;
case 194 :
inChar = 0;
// Keyboard.write(inChar);
break;
default :
Keyboard.write(inChar);
}
}
}
Android POC APP02
Install Visual Studio 2017 Community Edition from https://www.visualstudio.com/
Select the following modules.


Once it has installed (which takes ages).
Now essentially all we are looking to do is drop a few buttons and fields onto the layout, then code in the process to open the Bluetooth devices and send over the keystrokes we want to see happen on the host we plugged the dongle into. We can lock/unlock and login to the host, as well as send over the contents of an exploit if we chose to be bad.
Create a new project > c# > android > Single view app

Under Solution Explorer > Resources > layout > main.axml
Remove the existing button.
Add 2 button’s and 4 textView and 3 editText
Edit properties for all editText background = @android:color/holo_blue_light
Change the button1 text = Send Static credentials
Change the button2 text = Send Fields Below
Change textView1 text = Username
Change textView2 text = Password
Change textView2 inputType = textPassword
Change textView3 text = Routine
Change textView4 text = 0: password | 1: tab | 2: return | 3: Winkey+L [lock] | 4: CTRL+ALT+DEL | 5: CTRL+ALT+DEL return username tab password return | 6: CTRL+ALT+DEL password return | 7: return(wait 1sec) password | 8: username tab password

Finally we are done with the layout and can move onto the code.
Open MainActivity.cs
We add some class based variables.
private BluetoothSocket socket;
string username;// = dusername.Text;
string password;// = dpassword.Text;
int routine;// = Convert.ToInt32(droutine.Text);
Then we define within the OnCreate function our buttons and events.
Button button1 = FindViewById
Now we create a few new functions.
public void SendBTdata(string dIdentity, string dSecret, int dModifier)
{
BluetoothAdapter adapter = BluetoothAdapter.DefaultAdapter;
Action finish = new Action(async delegate
{
if (socket == null)
{
BluetoothDevice device = (from bd in adapter.BondedDevices where bd.Name == “HC-06” select bd).FirstOrDefault();
if (device == null)
{
return;
}
socket = device.CreateRfcommSocketToServiceRecord(Java.Util.UUID.FromString(“00001101-0000-1000-8000-00805f9b34fb”));
}
if (!socket.IsConnected)
await socket.ConnectAsync();
if (dIdentity == null) { dIdentity = “”; }
if (dSecret == null) { dSecret = “”; }
//if (dModifier == null ) { dModifier = 0; }
byte[] identityOutput = stringToBytes(dIdentity);
byte[] secretOutput = stringToBytes(dSecret);
try
{
switch (dModifier)
{
case 1: // tab
socket.OutputStream.WriteByte(179);
break;
case 2: // return
socket.OutputStream.WriteByte(176);
break;
case 3: // Winkey+L [lock]
socket.OutputStream.WriteByte(19);
break;
case 4: // CTRL+ALT+DEL
socket.OutputStream.WriteByte(20);
break;
case 5: // CTRL+ALT+DEL return username tab password return [logon A]
socket.OutputStream.WriteByte(20); // CTRL+ALT+DEL
socket.OutputStream.WriteByte(176);// return
await socket.OutputStream.WriteAsync(identityOutput, 0, identityOutput.Length);
socket.OutputStream.WriteByte(179); // tab
await socket.OutputStream.WriteAsync(secretOutput, 0, secretOutput.Length);
socket.OutputStream.WriteByte(176); // return
break;
case 6: // CTRL+ALT+DEL password return [unlock]
socket.OutputStream.WriteByte(20); // CTRL+ALT+DEL
await socket.OutputStream.WriteAsync(secretOutput, 0, secretOutput.Length);
socket.OutputStream.WriteByte(176); // return
break;
case 7: // return(wait 1sec) password [unlock win 10 localhost]
socket.OutputStream.WriteByte(176); // return
await System.Threading.Tasks.Task.Delay(1000);
await socket.OutputStream.WriteAsync(secretOutput, 0, secretOutput.Length);
break;
case 8: /// username tab password
await socket.OutputStream.WriteAsync(identityOutput, 0, identityOutput.Length);
socket.OutputStream.WriteByte(179); // tab
await socket.OutputStream.WriteAsync(secretOutput, 0, secretOutput.Length);
break;
default: // password
await socket.OutputStream.WriteAsync(secretOutput, 0, secretOutput.Length);
break;
}
}
catch(Exception ex)
{
Console.WriteLine(ex.ToString());
try { socket.Close(); } catch (Exception e) { }
socket = null;
}
// clean sensitive data asap
identityOutput = null;
secretOutput = null;
dIdentity = null;
dSecret = null;
});
if (socket != null)
finish();
else if (adapter == null)
{
//AndroidMethods.message(“Error”, “No bluetooth adapter found.”, “OK”, this);
return;
}
else if (!adapter.IsEnabled)
{
else
finish();
}
public static byte[] stringToBytes(string value)
{
byte[] bytes = new byte[value.Length * sizeof(char)];
System.Buffer.BlockCopy(value.ToCharArray(), 0, bytes, 0, bytes.Length);
return bytes;
}
public static string bytesToString(byte[] bytes)
{
char[] chars = new char[bytes.Length / sizeof(char)];
System.Buffer.BlockCopy(bytes, 0, chars, 0, bytes.Length);
return new string(chars);
}
public static byte[] charsToBytes(char[] chars)
{
int length = chars.Length;
byte[] returnVal = new byte[length];
for (int x = 0; x < length; x++)
returnVal[x] = (byte)chars[x];
return returnVal;
}
Finally open the project properties to add required permissions > android manifest > required permissions; tick ‘Bluetooth’ ‘Bluetooth_admin’ ‘Bluetooth_priviledged’
Now you can plug in your phone over usb, and enable the developer settings, you can build and then deploy over ADB to your handset and finally test the entire solution.
Have fun!
Regards
Martyn Kemp